This is about a lighthouse keeper and his lost love

At Sea’s Edge – Vigil to the Lighthouse

At sea's edge, to listen, not to look.
For her whispers, Neptune took.
A memory, a strand of hair;
Just air remains, without her there.

He walks the shore where tide-fall clings,
Salt-wind threading through, and sings.
His steps recall her gliding feet,
That danced where lapping tides dared meet.

This joyous soul
Laughed at signs and mocked the squall.
A storm-born sprite, barefoot and wild.
The sea grew still to hear her call.

Then rose, and swept her breath away.

Now in the tower, night and day,
He tends the flame with certain hands,
A beacon stretched along the sands.

Its beam sweeps wide, but finds no trace.
Nor hair, nor any saving grace.

And yet, when moonlight bends just so,
He swears he sees her down below,
A shimmer, then a sudden hush,
His lover, in her ocean blush.

Kevin Flick 2025,
At Sea’s Edge – Vigil to the Lighthouse


Dry Aging Beef
How to dry age beef.
This technique of dry aging is good for top sirloin, prime rib or any cut of beef which can be cooked in dry heat (as opposed to wet heat - pot roasts for example).
A key requirement is decent marbling, and for this you need USDA Choice or (if you are fabulously wealthy) USDA Prime.
The fine fat marbling is what keeps the steak juicy and delicious, and without it the end result will be dry. USDA Select (the type generally available in stores) just isn't good enough.
Dry aging imparts a wonderful intense beef flavor and also tenderizes the meat for an excellent eating experience.

To be the dove that delivers the ambrosia pictured above, first, catch your beef.
(Dry aged, slow roasted top sirloin with a drizzle of mushroom ketchup. Accompanied by homemade horseradish sauce, rosemary roast potatoes, blue-cheese infused butter sauted partially dehydrated mushrooms, and good old yorkshire pudding, recipes to come.)
Albertson's was having a special on USDA Choice Top Sirloin - only $4 per pound!
So I researched this cut of beef looking for information on a top sirloin butt roast.
Here is a very colorful executive summary of dry aging beef.
Before you cook a dry aged cut, you need to trim off the outside layer of dried out, shriveled (and sometimes even moldy!) meat. If you try and dry age a one pound steak strip(why?), you will pretty much have to discard the whole thing, so bigger is definitely better. Get a joint of meat as large as your budget allows, and as big as your refrigerator and oven will hold.
I figured a whole top sirloin would be in 10-12lb range, and at less than 50 bucks, that was cool for my budget.
I was sure to ask the cheerful butcher to get the whole cut, including the fat cap, which is important to reduce wastage of the good meat, and also helpful in adding juiciness when cooked (with the cap on top, where a cap should be!)
I also asked him to tie it up for roasting, although I later found this isn't really necessary for top sirloin, since it holds itself together pretty well. Tying a prime rib roast however, is important.
To dry age beef for any length of time requires some special attention. It must be kept below 40F for sure, and ideally between 35F and 38F. If you let it get down to 32F, organic activity comes to a halt, and the frozen beef will just sit there doing nothing.
It is best to have a refrigerated space dedicated to dry aging meat only - if it shares space with other foodstuffs, you run the risk of the aromas from other food interfering.
The refrigerator must also be scrupulously clean, I used a weak bleach solution with a spray bottle and then left the fridge propped open for a day or two (before purchasing the steak) to air out any bleach odors.
If you have a spare fridge you are all good to go, I happened to have a kegerator (of which I am very proud!) not being used. I like it a lot for dry aging beef because it is a commercial quality fridge, and is able to hold its temperature very well.
Here is my setup:

The Summit Full Keg Beer Dispenser (5 lbs. CO2 Tank Included) has a tap, and the top of the cap pops off, providing a means of piping in a power cord and a thermometer cord. I stuffed the hole with a cloth.
This is convenient because it saves jamming the cords between the door and frame, and the cold heavy air stays in the box.
Inside, I placed a small table to hold the top sirloin, and underneath that is a small fan for air circulation, and a bed of silica gel. The fan ensures that a slight breeze is passing over the beef at all times, this helps the drying process, and also controls bacteria. I don't think they make the model shown in the picture anymore, but this one should do the job:
"The idea is to create moisture loss. What you’re doing is concentrating the flavor of the meat.” says Bryan Voltaggio, executive chef at Charlie Palmer Steak.
The silica gel keeps the air nice and dry, enhancing the dry aging process. You might think silica gel is expensive or hard to find. In fact it's not, you can get it at every supermarket in boxes in the cat litter section - look for the fanciest one and check the label. It should say silica sand, gel or crystals (regardless, silica always comes in the form of small rocks). And of course, get the Fragrance Free variety.
Some people suggest that you place paper towels over the aging beef, and changing every few days. However this is suspicious to me, I've not seen this done in restaurants that dry age. Using silica and a fan to keep down the humidity seems more hygienic.

Once you have everything set up, buy your meat, pat it dry it with paper towels, and place it into the fridge.
At the time my meat went into the fridge, the top sirloin steak weighed 11 lb 8oz.
Carefully monitor the temperature , making sure the thermometer showed between 35F and 38F all the time. After a few days, you should notice a slightly musty, blue-cheese aroma. This is good. The meat will begin to darken significantly in color.
I have done this procedure several times, the first time I carefully retrieved the meat and weighed it every few days. Weight loss continued through 14 days, after that there was not much difference.
I have heard of commercial dry aging (restaurants mostly) that continue the dry aging process for months. I believe this is mostly to let the flavor develop even further, and for the enzymes to continue their tenderizing action.
One of these enzymes is Glucuronidase. Another is cathepsin. There are approximately a dozen cathepsins, which are distinguished by their structure and which proteins they cleave. The Troponin protein tri-complex and the Actin, Myosin, kinase, Titin (largest), Dynein, Calcineurin and tropomyosin proteins are some of the muscle proteins that are broken down.

After two weeks it was time to retrieve my sacred pabulum!
At this time it weighed in at 10 lb 4oz. It had lost approximately 20oz of water or about 11% by weight. Decimated! Or I should say: Desiccated!
Now comes the sad part: trimming the meat. All that dried out jerky-like stuff has got to be cut away. Discard. (DON'T eat the trimmings, it's not at all like real jerky and DON'T be tempted to grind it up and add it to ground beef, just don't ok?)
Anyway, here we go:

And result!
The cleaned meat now looks nearly the same as the meat in stores, however it is a little darker and less brilliantly red. This also, is good.
After trimming the dry aged beef weighed 8lb 5oz. That is 3lb 3oz of weight loss from the starting weight.
20oz of water we didn't want, and nearly 35oz of what was once good meat wasted. Truly, this is the sad part. But the bonus is so much extra flavor and tenderness!
Wastage can be as high as 40%, however if you trim carefully you can minimize this.

I like to use an electric knife, my favorite model is this one: Leaving the fat cap on means that a lot of the trimming is fat, which you wouldn't eat anyway (would you?)
Anyway the dry aged beef is now ready for the next step: cooking.
I will show you another really, really long way of cooking the meat, because as you know, I like to take the longest possible time to cook anything.
This technique of dry aging is good for top sirloin, prime rib or any cut of beef which can be cooked in dry heat (as opposed to wet heat - pot roasts for example).
A key requirement is decent marbling, and for this you need USDA Choice or (if you are fabulously wealthy) USDA Prime.
The fine fat marbling is what keeps the steak juicy and delicious, and without it the end result will be dry. USDA Select (the type generally available in stores) just isn't good enough.
Dry aging imparts a wonderful intense beef flavor and also tenderizes the meat for an excellent eating experience.

To be the dove that delivers the ambrosia pictured above, first, catch your beef.
(Dry aged, slow roasted top sirloin with a drizzle of mushroom ketchup. Accompanied by homemade horseradish sauce, rosemary roast potatoes, blue-cheese infused butter sauted partially dehydrated mushrooms, and good old yorkshire pudding, recipes to come.)
Albertson's was having a special on USDA Choice Top Sirloin - only $4 per pound!
So I researched this cut of beef looking for information on a top sirloin butt roast.
Here is a very colorful executive summary of dry aging beef.
Before you cook a dry aged cut, you need to trim off the outside layer of dried out, shriveled (and sometimes even moldy!) meat. If you try and dry age a one pound steak strip(why?), you will pretty much have to discard the whole thing, so bigger is definitely better. Get a joint of meat as large as your budget allows, and as big as your refrigerator and oven will hold.
I figured a whole top sirloin would be in 10-12lb range, and at less than 50 bucks, that was cool for my budget.
I was sure to ask the cheerful butcher to get the whole cut, including the fat cap, which is important to reduce wastage of the good meat, and also helpful in adding juiciness when cooked (with the cap on top, where a cap should be!)
I also asked him to tie it up for roasting, although I later found this isn't really necessary for top sirloin, since it holds itself together pretty well. Tying a prime rib roast however, is important.
To dry age beef for any length of time requires some special attention. It must be kept below 40F for sure, and ideally between 35F and 38F. If you let it get down to 32F, organic activity comes to a halt, and the frozen beef will just sit there doing nothing.
It is best to have a refrigerated space dedicated to dry aging meat only - if it shares space with other foodstuffs, you run the risk of the aromas from other food interfering.
The refrigerator must also be scrupulously clean, I used a weak bleach solution with a spray bottle and then left the fridge propped open for a day or two (before purchasing the steak) to air out any bleach odors.
If you have a spare fridge you are all good to go, I happened to have a kegerator (of which I am very proud!) not being used. I like it a lot for dry aging beef because it is a commercial quality fridge, and is able to hold its temperature very well.
Here is my setup:

The Summit Full Keg Beer Dispenser (5 lbs. CO2 Tank Included)
has a tap, and the top of the cap pops off, providing a means of piping in a power cord and a thermometer cord. I stuffed the hole with a cloth.This is convenient because it saves jamming the cords between the door and frame, and the cold heavy air stays in the box.
Inside, I placed a small table to hold the top sirloin, and underneath that is a small fan for air circulation, and a bed of silica gel. The fan ensures that a slight breeze is passing over the beef at all times, this helps the drying process, and also controls bacteria. I don't think they make the model shown in the picture anymore, but this one should do the job:
"The idea is to create moisture loss. What you’re doing is concentrating the flavor of the meat.” says Bryan Voltaggio, executive chef at Charlie Palmer Steak.
The silica gel keeps the air nice and dry, enhancing the dry aging process. You might think silica gel is expensive or hard to find. In fact it's not, you can get it at every supermarket in boxes in the cat litter section - look for the fanciest one and check the label. It should say silica sand, gel or crystals (regardless, silica always comes in the form of small rocks). And of course, get the Fragrance Free variety.
Some people suggest that you place paper towels over the aging beef, and changing every few days. However this is suspicious to me, I've not seen this done in restaurants that dry age. Using silica and a fan to keep down the humidity seems more hygienic.

Once you have everything set up, buy your meat, pat it dry it with paper towels, and place it into the fridge.
At the time my meat went into the fridge, the top sirloin steak weighed 11 lb 8oz.
Carefully monitor the temperature , making sure the thermometer showed between 35F and 38F all the time. After a few days, you should notice a slightly musty, blue-cheese aroma. This is good. The meat will begin to darken significantly in color.
I have done this procedure several times, the first time I carefully retrieved the meat and weighed it every few days. Weight loss continued through 14 days, after that there was not much difference.
I have heard of commercial dry aging (restaurants mostly) that continue the dry aging process for months. I believe this is mostly to let the flavor develop even further, and for the enzymes to continue their tenderizing action.
One of these enzymes is Glucuronidase. Another is cathepsin. There are approximately a dozen cathepsins, which are distinguished by their structure and which proteins they cleave. The Troponin protein tri-complex and the Actin, Myosin, kinase, Titin (largest), Dynein, Calcineurin and tropomyosin proteins are some of the muscle proteins that are broken down.

After two weeks it was time to retrieve my sacred pabulum!
At this time it weighed in at 10 lb 4oz. It had lost approximately 20oz of water or about 11% by weight. Decimated! Or I should say: Desiccated!
Now comes the sad part: trimming the meat. All that dried out jerky-like stuff has got to be cut away. Discard. (DON'T eat the trimmings, it's not at all like real jerky and DON'T be tempted to grind it up and add it to ground beef, just don't ok?)
Anyway, here we go:

And result!
The cleaned meat now looks nearly the same as the meat in stores, however it is a little darker and less brilliantly red. This also, is good.
After trimming the dry aged beef weighed 8lb 5oz. That is 3lb 3oz of weight loss from the starting weight.
20oz of water we didn't want, and nearly 35oz of what was once good meat wasted. Truly, this is the sad part. But the bonus is so much extra flavor and tenderness!
Wastage can be as high as 40%, however if you trim carefully you can minimize this.

I like to use an electric knife, my favorite model is this one: Leaving the fat cap on means that a lot of the trimming is fat, which you wouldn't eat anyway (would you?)
Anyway the dry aged beef is now ready for the next step: cooking.
I will show you another really, really long way of cooking the meat, because as you know, I like to take the longest possible time to cook anything.
Kevin's quick guide to Las Vegas
Due to popular demand, here is my quick guide to Vegas, if you are staying at the Bellagio:
I think Okada, Wynn is great.
Reserve 5 minutes for looking at the ceilings in the Bellagio (you'll understand when you get there).
Check out the Paris, opposite the Bellagio, and don't miss the bar at the top of the Rio which has a spectacular view, day or night.
The Rio also has a free "show in the sky" which I remember as quite fun if you get there at the right time. It's like a parade suspended from the ceiling.
Caesars Palace is kitschy with its 70's faux Roman theme.
New York New York has lions! And it also has a tram that can take you to the Luxor - good rides/walkthroughs there.
Avoid the Excalibur unless you want to see their horse-show and eat a turkey drumstick - can be great if you like that sort of medieval thing.
Lots to do without gambling, but try hitting the penny slots (if you can find them) and tip a buck for each free drink. 2 bucks they come faster.
I don't like shows much, but your concierge will help you choose.
Let me know how it goes and have fun!
New note: 4/21/2021
How to make mustard: a mustard recipe.
As far as I could google, there is no other modern recipe for making mustard from mustards seeds available, if there is let me know. What I have created below is based on some old english texts, plus the flour ingredient from the ingredient list on the bottle for the mustard flavor I am trying create: Coleman's English Mustard. The citric acid (lemon juice) and the salt come from that too. The proportions I arrived at by experimentation, and seem about right. The mustard tastes floury until you let the whole thing rest in the jar for a day. After this time, the mustard flavor really shines too. Brown mustard seeds are available from Middle Eastern stores, yellow mustard seeds seem hard to come by in California, I had to go to a specialist herbal store, but they were still just as inexpensive.
Ingredients
3 level tablespoons each of yellow (white) mustard seed and brown (black) mustard seeds
1 cup of water
1/2 cup flour
1 tsp turmeric (for color) (ooh!)
2 tablespoons lemon juice
2 tbsp whey (optional - will extend shelf life up to 4 months)
1 level tablespoon of salt
1 tablespoon of powdered sugar
2 cloves garlic, crushed (optional)
Directions
The International Marketplace
Note: unless you are in Las Vegas, this store is obviously not very convenient. But then, a lot of people do visit, and it is close to the strip.
Often is the time that I come across something on the internet, or in a recipe that is difficult or seeming impossible to find. Pig's ears for example. Foie Gras,

Or how about Marmite, Cod roe, Coleman's Mustard and all the British items nearly impossible to find outside of the UK.
Then there is ahi poke, teriyake nori and cod liver.
My friend casually mentioned that he had been to International Marketplace the previous day and had picked up some Marmite - in an inverted plastic jar!
Heresy I cried! Did he not know that the very name "marmite" comes from an earthenware or metal pot? With a picture of a marmite on every jar?
My curiousity was piqued, so I decided to run down to Decatur and Tropicana and take a look.
Oh. My. God.

This place has everything.
Everything.
Japanese, Philippino, Hawaiian, Eastern European, British.
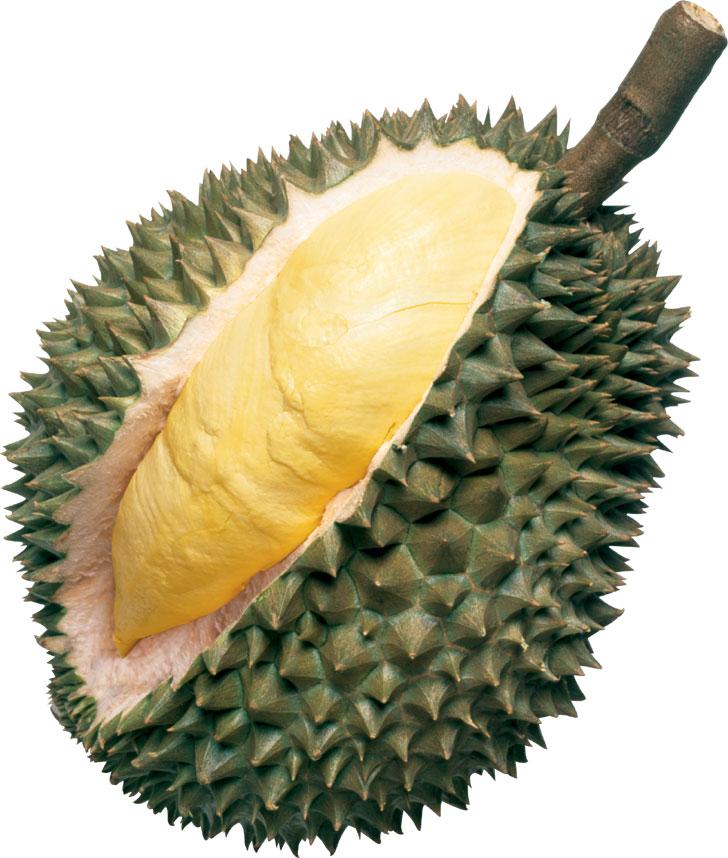
Rare Dutch chocolates, fresh fish, lobsters, oysters, durian fruit, German sausage, brazilian chorizo, italian hard salami, greek taramasalata - it just blew me away.
After the first hour, I had to go outside and sit just to calm myself down a little bit. Most of the time my lower jaw was dangling around my kneecaps.
Naturally I bought a $10 membership card for a 5% discount (I WILL RETURN MANY MANY TIMES), and here is what I came away with today:
- 1 Young coconut, $1.09
Love that sweet milk. - 4lb durian, $4.09
never tried this before.
Super stinky, but tastes something like smoked avocado crossed with cherimoya. Sweet, creamy, actually really good! - Limu poke, $10.99lb
always a great snack - Melon Creamy Soda $1.69 (like Cream Soda, with melon)
Cream Soda was the recommended hangover cure at college, now with a melon twist! - Shirakiku, soft yoghurt drink, 59c (!)
- King Oscar tinned Cod Liver $3.19
Can this be as good as monkfish liver? - Coleman's Mustard $4.69 170g
Essential for any Brit.
Guarana Antartica $2.99
Never tried this. Curious again.- Giant Spanish Capers(Goya) $3.49
Never seen these for sale before, several recipes I've tried call for them. - Latvian Sprats in Oil $1.49
What I originally went for, and they are good! - Clam Juice, tins, large $2.69 for 48oz (!)
I make my own clamato for chalada beer. Find a huge 48oz tin at 5c/oz is way better than the little 8oz jars for $2.69 - Sunmore Cod Roe $6.49
I love this with fish and chips, battered like the fish.
Teriyaki Nori (Hot) $1.99
Just a great little spicy snack. Use for eel sushi too!


And these prices are good! As good or better than the corresponding national speciality stores (much better than British store ripoffs).
I am a happy boy.
Carbonator Cap
As you'll know from my Dry Aging Beef post, I am the proud owner of a Summit Full Keg Beer Dispenser (5 lbs. CO2 Tank Included):
When you have a keg in the kegerator, a CO2 bottle is needed to keep the beer charged.
You will have a CO2 5lb tank, a gauge and a tube with connectors each end.
There are two types of connector for charging a beer keg, one for Domestic and one for European styles. You have to switch out when changing between the two, but it's not hard.
And it's just as easy to switch the connector to the Carbonator Cap.
You can make your own, shown here, or you can buy them here.
The latter are pretty pricey, but I will show you a way to rotate them effectively, yet still have several bottles of carbonated drinks with only two caps.
Here are the ingredients and machinery you need to make club soda.
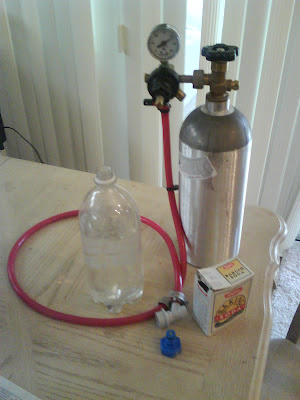
You will need to collect a few PET bottles. These are easy to find - any carbonated soft drink in plastic is in a PET bottle. PET stands for polyethylene terephthalate, it's the same stuff they make polyester suits out of.

Once the contents are consumed, you can re-use these bottles dozens of times for your own home carbonation.
Here is the trick to get lots of carbonated bottles with only two carbonator caps:
use your freezer. Once you have a pair of plastic PET bottles carbonated, freeze them for 1-1/2 to 2 days.
The carbon dioxide will be fixed in the frozen liquid, and you can swap out the expensive carbonator caps for regular caps, and let them come back up to temperature in the refrigerator.
When I first tried this, I used orange juice, but only froze them for less than a day. The frozen froth that came out was a truly intense frozen orange dessert.
You might also want to try carbonated chicken consomme. I like to call it "chicken-up"
:When you have a keg in the kegerator, a CO2 bottle is needed to keep the beer charged.
You will have a CO2 5lb tank, a gauge and a tube with connectors each end.
There are two types of connector for charging a beer keg, one for Domestic and one for European styles. You have to switch out when changing between the two, but it's not hard.
And it's just as easy to switch the connector to the Carbonator Cap.
You can make your own, shown here, or you can buy them here.

The latter are pretty pricey, but I will show you a way to rotate them effectively, yet still have several bottles of carbonated drinks with only two caps.
Here are the ingredients and machinery you need to make club soda.

You will need to collect a few PET bottles. These are easy to find - any carbonated soft drink in plastic is in a PET bottle. PET stands for polyethylene terephthalate, it's the same stuff they make polyester suits out of.

Once the contents are consumed, you can re-use these bottles dozens of times for your own home carbonation.
Here is the trick to get lots of carbonated bottles with only two carbonator caps:
use your freezer. Once you have a pair of plastic PET bottles carbonated, freeze them for 1-1/2 to 2 days.
The carbon dioxide will be fixed in the frozen liquid, and you can swap out the expensive carbonator caps for regular caps, and let them come back up to temperature in the refrigerator.
When I first tried this, I used orange juice, but only froze them for less than a day. The frozen froth that came out was a truly intense frozen orange dessert.
You might also want to try carbonated chicken consomme. I like to call it "chicken-up"
Mushroom Ketchup and Mushrooms for Steak Recipes
Mushroom Ketchup Recipe
Mushrooms for Steak Recipe
The mushroom ketchup is from a recipe in Heston Blumenthal's In Search of Perfection: Reinventing Kitchen Classics .
.
 Take a pound (.5kg) of button mushrooms, pre-sliced is fine, otherwise slice them similarly, and put them in a strainer over a bowl.
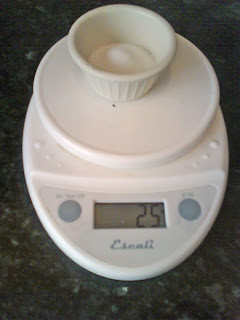 Measure out 25g (a bit less than an ounce) of salt. For measurements like this I use the Escali Primo Digital Scale
 which is very accurate, and can weigh up to 11 lbs. It also can measure in grams, which is convenient if you are working from European recipes.
Toss the mushrooms in the salt. Cover the strainer and bowl, and leave in the refrigerator overnight.
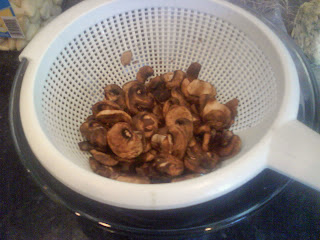 The next day you will have partially dried mushrooms and dark brown mushroom juice, which is going to be full of mushroom umami goodness and pretty damn salty to boot.
Reserve the mushrooms.
For each pint of mushroom juice, add 1/2 cup red wine, 1/4 cup of red wine vinegar, a dash of mace, 10 black peppercorns, 2 cloves, and 1 shallot (or 2 cloves of garlic, or a couple slices of onion).
Reduce the liquid by half, and strain finely, discarding the solid.
Return the liquid to the pan, and add cornflour slowly, until the desired ketchup consistency is reached.
The mushroom ketchup will keep for a month in a jar in the fridge.
When you are ready to prepare the partially dried mushrooms, simply saute them in a generous portion of butter, or for extra specialness, use the butter from the blue-cheese/butter infusion recipe here.

Mushrooms for Steak Recipe
The mushroom ketchup is from a recipe in Heston Blumenthal's In Search of Perfection: Reinventing Kitchen Classics
. Take a pound (.5kg) of button mushrooms, pre-sliced is fine, otherwise slice them similarly, and put them in a strainer over a bowl.Measure out 25g (a bit less than an ounce) of salt. For measurements like this I use the Escali Primo Digital Scale which is very accurate, and can weigh up to 11 lbs. It also can measure in grams, which is convenient if you are working from European recipes.
Toss the mushrooms in the salt. Cover the strainer and bowl, and leave in the refrigerator overnight.
 The next day you will have partially dried mushrooms and dark brown mushroom juice, which is going to be full of mushroom umami goodness and pretty damn salty to boot.
Reserve the mushrooms.
For each pint of mushroom juice, add 1/2 cup red wine, 1/4 cup of red wine vinegar, a dash of mace, 10 black peppercorns, 2 cloves, and 1 shallot (or 2 cloves of garlic, or a couple slices of onion).
Reduce the liquid by half, and strain finely, discarding the solid.
Return the liquid to the pan, and add cornflour slowly, until the desired ketchup consistency is reached.
The mushroom ketchup will keep for a month in a jar in the fridge.
When you are ready to prepare the partially dried mushrooms, simply saute them in a generous portion of butter, or for extra specialness, use the butter from the blue-cheese/butter infusion recipe here.

Horseradish Sauce Recipe
First catch your horseradish.
Horseradish isn't that easy to find in U.S. markets, I've only found it about 1 store in 4. However asian markets almost always have them. I love asian markets, they've always got the stuff that's hard to find, and with a busy one with a high turnover, the ingredients will be fresher too.
1 large piece of horseradish (1lb) with outer skin mostly removed
 2 tbsp vinegar
2 cups mayo
1 tsp paprika
Here is a one that has been peeled (ignore the ginger).
Cut the root in half and clean your juicer well. I use the Big Mouth Pro.
 Place a clean new 4 gallon trash bag in the catch container, and juice one half of the horseradish. This will produce a small amount of juice, and a lot of grindings.
Watch out! The enzymes produced are a hell of a lot stronger than freshly chopped onions, so maybe do this outside, with swim-goggles on!
Combine the juice and grindings in a mixing bowl and mix in 1 tablespoon of vinegar to fix the flavors in.
According to Wikipedia, these enzymes from the damaged plant cells break down sinigrin (a glucosinolate) to produce allyl isothiocyanate (mustard oil), and will irritate your sinuses and eyes.
All you really need to know is that it stings a lot.
 Take the other half of horseradish and grate it. Here I am using the Cuisinart 11 Cup. These gratings will give a nice texture to the final sauce.
Add these to the mixing bowl and mix in another tablespoon of vinegar.
Here are the horseradish juice, grindings and gratings just before mixing.

Then just add a couple cups of mayonnaise (more or less to taste), store in a jar, and keep in the fridge for up to a month.
Horseradish isn't that easy to find in U.S. markets, I've only found it about 1 store in 4. However asian markets almost always have them. I love asian markets, they've always got the stuff that's hard to find, and with a busy one with a high turnover, the ingredients will be fresher too.
1 large piece of horseradish (1lb) with outer skin mostly removed
 2 tbsp vinegar
2 cups mayo
1 tsp paprika
Here is a one that has been peeled (ignore the ginger).
Cut the root in half and clean your juicer well. I use the Big Mouth Pro.
Place a clean new 4 gallon trash bag in the catch container, and juice one half of the horseradish. This will produce a small amount of juice, and a lot of grindings.Watch out! The enzymes produced are a hell of a lot stronger than freshly chopped onions, so maybe do this outside, with swim-goggles on!
Combine the juice and grindings in a mixing bowl and mix in 1 tablespoon of vinegar to fix the flavors in.
According to Wikipedia, these enzymes from the damaged plant cells break down sinigrin (a glucosinolate) to produce allyl isothiocyanate (mustard oil), and will irritate your sinuses and eyes.
All you really need to know is that it stings a lot.
Take the other half of horseradish and grate it. Here I am using the Cuisinart 11 Cup. These gratings will give a nice texture to the final sauce. Add these to the mixing bowl and mix in another tablespoon of vinegar.
Here are the horseradish juice, grindings and gratings just before mixing.

Then just add a couple cups of mayonnaise (more or less to taste), store in a jar, and keep in the fridge for up to a month.
Review: Perfection
A review of
Heston Blumenthal: In Search of Perfection: Reinventing Kitchen Classics
.Yep, it's Alton Brown on steroids.
I am a big fan of Alton Brown, and now I have found an even greater hero: Heston!
Just one thing though - he scares the living daylights out of me - if he weren't in a kitchen the only safe place for him is a padded lockdown.
 I've made about two (more now) of the recipes so far, and I am looking forward to doing more. I have already ordered Further Adventures in Search of Perfection
 and pre-ordered his (very expensive) The Big Fat Duck Cookbook
 .
.On his Fish and Chips:
Alas, no turbot on the US West Coast. Maybe no-one understands me because I use the English pronunciation (like fillet) - pronouncing both t's, unlike the American/French with a silent 2nd t.
I used halibut - love halibut.
His batter method is unnecessarily long-winded. I used a 5lb CO2 bottle with a special adapter for a standard plastic soda bottle instead of a soda siphon, With this exception completed his recipe and found where the book's true value is:
It didn't work for me, but it allowed me to see where to improve my beer batter recipe that I have used for years.
I now use 2/3 beer, 1/3 vodka, (plus a large splash of lemon juice and paprika).
And now I make very small batter batches, don't wait for the every last lump to disappear, batter immediately, and straight in the fryer - all as fast as possible. It is a tangible improvement - thanks Heston!
His chips (french fries) again has what to my unrefined palette is an unnecessary step - the initial boil.
Instead I now extend my initial low temp (300F) fry to 10 mins, and cool completely in the 'fridge.
But I found an improvement - I use a little portable fan to blow over the fries to hurry along the dehydration process - all thanks to Heston!
I also tried the entire steak recipe which was 100% great, and the mushroom ketchup is to die for!
The recipe calls for the meat to cook at (exactly) 120F for 24 hours. Sounds dangerous? Well it hasn't been for me, and I've tried it three times (more now).
This lengthy warming allows enzymes to break down the other proteins in the meat, tenderizing it and adding flavor.
One of these enzymes is Glucuronidase.
Another is cathepsin. There are approximately a dozen cathepsins, which are distinguished by their structure and which proteins they cleave.
The Troponin protein tri-complex and the Actin, Myosin, kinase, Titin (largest), Dynein, Calcineurin and tropomyosin proteins are some of the muscle proteins that are broken down. For example, Actin starts to degrade as the meat passes upwards of 70F (20C).
The reason that Heston sears the meat before the long 120F slow cook (and I know because I did it) is that the Maillard reaction flavors from the sear spend that time permeating through the meat.
Do I care that his reasoning is off at a tangent? NO.
You know why? Because it is the best damn tasting steak I have ever made. Good enough?
And if he tests 5 varieties of potatoes to get the best roast potato, yet doesn't draw a sufficiently tight logical line to satisfy Mr J. Alt, I don't care either. The man has sufficient bone fides for me to trust his judgement and conclusions.
And you know why I doubly don't care? I can't get Maris Pipers in the U.S. anyway!
I used his method of trying every potato I could get my hands on and made my own judgement. *
Which is what any reader of these reviews should also do.
I recommend this book.
Kevin
* I decided on White Rose. Thanks yet again, Heston!
Featured:
Bel Cream Maker
I just discovered that there is such a thing as a home double cream maker!
There is a great post here: Cooking in someone else's kitchen: Another historic appliance.
I already sometimes make my own cream
I wonder if I can extend the process somehow to make double cream, take equal parts of this butter and more cream? I'll have to try it. If I can't get it to work, then I will need this handy Bel Cream Maker tool!
There is a great post here: Cooking in someone else's kitchen: Another historic appliance.
I already sometimes make my own cream
I wonder if I can extend the process somehow to make double cream, take equal parts of this butter and more cream? I'll have to try it. If I can't get it to work, then I will need this handy Bel Cream Maker tool!
Pizza Time: Margharita madness! Assemble, cook, eat.
It's time to assemble the pizza.
First get your oven very hot.

Hot, hot, hot! As hot as it will go.
Here I am using two of my favorite toys, the Hamilton Beach 31199 Counter Top Rotisserie Oven and the Raytek MT6 Mini Temp Infrared Thermometer
 .
.
The oven has a huge (for a toaster oven) 1 cubic foot of space inside, and includes convection, so it can cook things real quick. Pre-heat your oven as high as it will go, the highest I could get mine was about 650F. Even higher would be better, so long as you don't start a fire!
Here I was using the oven pan, however I have since had much better result using a 12" terra cotta paver (unglazed) for about $2 from Home Depot.
Another blog of mine documents my attempts to create an oven that reaches 1000F. We'll see how that goes.
Meanwhile, assemble the pizza.
Take 4 or 5 of the oven dried tomatoes and arrange them decoratively.
Then tear pieces of mozarella and intersperse among the tomatoes.
If you want to be genuinely Italian, then hardly put anything on at all. If you want more - have more!
Lay a few basil leaves over the top of all this, then drizzle with a little extra virgin olive oil.
Season with pepper and smoked sea salt to taste, then carefully slide into the oven. How you do this is up to you, but obviously it's best to have a proper pizza peel (with a short handle, if you don't have a commercial sized kitchen).
Watch the pie carefully as best you can. Try and rotate it after a few minutes to get more even cooking. It will be ready when some of the mozarella starts to turn brown and bubbles slightly. The time will depend on your oven and how hot you can get it (hot, hot hot!)
Then let it cool for a minute or two - you don't want to burn your mouth!
Use your favorite pizza cutting tool to slice up the pizza.
I like to use the
Zyliss Slicer ,
,
because it gives you proper leverage to cut safely, and snaps apart for easy cleaning.
And here we have it, the perfect Pizza Margharita:

First get your oven very hot.

Hot, hot, hot! As hot as it will go.
Here I am using two of my favorite toys, the Hamilton Beach 31199 Counter Top Rotisserie Oven
and the Raytek MT6 Mini Temp Infrared Thermometer.The oven has a huge (for a toaster oven) 1 cubic foot of space inside, and includes convection, so it can cook things real quick. Pre-heat your oven as high as it will go, the highest I could get mine was about 650F. Even higher would be better, so long as you don't start a fire!
Here I was using the oven pan, however I have since had much better result using a 12" terra cotta paver (unglazed) for about $2 from Home Depot.
Another blog of mine documents my attempts to create an oven that reaches 1000F. We'll see how that goes.
Meanwhile, assemble the pizza.
Take 4 or 5 of the oven dried tomatoes and arrange them decoratively.
Then tear pieces of mozarella and intersperse among the tomatoes.
If you want to be genuinely Italian, then hardly put anything on at all. If you want more - have more!
Lay a few basil leaves over the top of all this, then drizzle with a little extra virgin olive oil.
Season with pepper and smoked sea salt to taste, then carefully slide into the oven. How you do this is up to you, but obviously it's best to have a proper pizza peel (with a short handle, if you don't have a commercial sized kitchen).
Watch the pie carefully as best you can. Try and rotate it after a few minutes to get more even cooking. It will be ready when some of the mozarella starts to turn brown and bubbles slightly. The time will depend on your oven and how hot you can get it (hot, hot hot!)
Then let it cool for a minute or two - you don't want to burn your mouth!
Use your favorite pizza cutting tool to slice up the pizza.
I like to use the
Zyliss Slicer
, because it gives you proper leverage to cut safely, and snaps apart for easy cleaning.
And here we have it, the perfect Pizza Margharita:

Pizza Time: Margharita madness! The dough and the sauce.
Hehe, more Heston madness.
For the dough, have 500g (about a pound) of flour, I used all-purpose, but there is probably some super dough with exactly 12% protein content. Don't know, don't care. Flour is flour to me.
Mix with water in a water-to-flour 17:30 ratio (hey do the math!)
If you are really nuts, you can prepare 1/3 of the dough 12 hours ahead of time, if you can tell the difference, let me know.
[OK, OK.
For the pre: 1/3 = 167g flour, 17/30 = 95g water.
For the final: 2/3 = 333g flour, 17/30 = 189g water.
Jeez.
]
Divide the dough into 5 equal balls and let rest out of the fridge for 2 hours.
Meanwhile, take half of your peeled tomatoes, cut nearly in half, and squeeze out the juice into a largish stainless steel pot. You are going to boil them to a mush, so no need to be gentle. If the tomatoes came on the vine, put the vines in too - more flavor apparently.
Careful with tomatoes - they are very acidic - so don't put them in a copper pan unless you like the taste of copper and no pan.
Bring to a boil, set to a very low heat, and simmer for ages. Two hours or more. Be sure to stir frequently so the bottom layer doesn't burn. You want a soft mush like thick spaghetti sauce. Alternatively, buy a jar of spaghetti sauce and use that.
Take one ball of dough. Using your hands flatten it out into a perfect circle. If you want to throw it spinning into the air be my guest, I just flattened it out. The dough will be as perfectly circular as you are a perfect person, so try hard.
Take a spoon, or better a ladle, and put some sauce on the dough. Use the back side of the ladle to squish the sauce nearly, but not quite, to the edges of the circle.
Your pizza base is now prepared!
I can't wait for Heston Blumenthal's next offering:
Further Adventures in Search of Perfection and I've decided to splurge on:
The Big Fat Duck Cookbook .
.
The latter isn't coming out until November of this year, and at $150+ I will need all of that time to save my pennies. I'm going to get a 5% discount for pre-ordering, which counts for a lot at this price!
For the dough, have 500g (about a pound) of flour, I used all-purpose, but there is probably some super dough with exactly 12% protein content. Don't know, don't care. Flour is flour to me.
Mix with water in a water-to-flour 17:30 ratio (hey do the math!)
If you are really nuts, you can prepare 1/3 of the dough 12 hours ahead of time, if you can tell the difference, let me know.
[OK, OK.
For the pre: 1/3 = 167g flour, 17/30 = 95g water.
For the final: 2/3 = 333g flour, 17/30 = 189g water.
Jeez.
]
Divide the dough into 5 equal balls and let rest out of the fridge for 2 hours.
Meanwhile, take half of your peeled tomatoes, cut nearly in half, and squeeze out the juice into a largish stainless steel pot. You are going to boil them to a mush, so no need to be gentle. If the tomatoes came on the vine, put the vines in too - more flavor apparently.
Careful with tomatoes - they are very acidic - so don't put them in a copper pan unless you like the taste of copper and no pan.
Bring to a boil, set to a very low heat, and simmer for ages. Two hours or more. Be sure to stir frequently so the bottom layer doesn't burn. You want a soft mush like thick spaghetti sauce. Alternatively, buy a jar of spaghetti sauce and use that.
Take one ball of dough. Using your hands flatten it out into a perfect circle. If you want to throw it spinning into the air be my guest, I just flattened it out. The dough will be as perfectly circular as you are a perfect person, so try hard.
Take a spoon, or better a ladle, and put some sauce on the dough. Use the back side of the ladle to squish the sauce nearly, but not quite, to the edges of the circle.
Your pizza base is now prepared!
I can't wait for Heston Blumenthal's next offering:
Further Adventures in Search of Perfection
and I've decided to splurge on: The Big Fat Duck Cookbook
.The latter isn't coming out until November of this year, and at $150+ I will need all of that time to save my pennies. I'm going to get a 5% discount for pre-ordering, which counts for a lot at this price!
Pizza Time: Margharita madness! The tomato prep.
OK it's time for a pizza.
Well, not right now. Since I like to take the longest possible time to cook anything, it'll be pizza time in 12 hours or so.
That's what happens when you base your recipes on Heston Blumenthal .
.
Buy some cheap tomatoes, roma are fine, any will do. Cheap counts, you want at least 7 lbs for all this fuss.
First step, prep the tomatoes. Take out the top part of the core near the vine and discard. Incise a cross in the side for easier peeling. Plunge into a boiling pot of water for 20 seconds (less if very ripe) then into an ice bath.
Keep half of the tomatoes for the sauce.
Halve them, and seed them out, then place on a cookie sheet. Save the seeds and juice for the sauce too.
Drizzle a little olive oil over them, and add a sprinkling of thyme and basil.
Slice up some garlic (I buy ready peeled - bad chef!) and place into the well of each tomato.
Add a powdering of sugar, and add fresh ground pepper and smoked sea salt.
Pop in a convection oven at 225F for 90 minutes, turn then 90 minutes more.
Featured:
Well, not right now. Since I like to take the longest possible time to cook anything, it'll be pizza time in 12 hours or so.
That's what happens when you base your recipes on Heston Blumenthal
.Buy some cheap tomatoes, roma are fine, any will do. Cheap counts, you want at least 7 lbs for all this fuss.
First step, prep the tomatoes. Take out the top part of the core near the vine and discard. Incise a cross in the side for easier peeling. Plunge into a boiling pot of water for 20 seconds (less if very ripe) then into an ice bath.
Keep half of the tomatoes for the sauce.
Halve them, and seed them out, then place on a cookie sheet. Save the seeds and juice for the sauce too.
Drizzle a little olive oil over them, and add a sprinkling of thyme and basil.
Slice up some garlic (I buy ready peeled - bad chef!) and place into the well of each tomato.
Add a powdering of sugar, and add fresh ground pepper and smoked sea salt.
Pop in a convection oven at 225F for 90 minutes, turn then 90 minutes more.
Featured:
Heston Blumenthal's Twist in the Tail
I made Heston Blumenthal's Twist in the Tail recipe yesterday. Actually yesterday, the day before and the day before that too.
Because I have made a few of Heston's recipes before I pretty much knew what I was in for.
I knew if I was going to that much trouble, I wanted more meat, so I grabbed 5lbs of 7 bone chuck steak on special for 99c lb, and 2 lbs of oxtail at $5 lb (no special there) for the oxtail's truly great flavor.
I bought some cheapo red plonk for $5 for 1.5L, so overall I was able to keep the cost down and the yield high.
I got these really great vegetables, leeks, tomatoes, mushrooms, and on and on. Chop em up, fry em, and add them all in.
And with a sinking feeling I realized that they were all going to be discarded. Sad.
The result? An absolutely insanely great stew. And that is what Heston is all about: insane, and great.
Another relative commented on the interesting and subtle sweet notes in the stew.
I tried to wave it off as being the sweetness of the cooked onions, but nooooo, that wasn't good enough!
So I was shamefacedly forced to reveal that yes, I had caramelized some turbinado sugar in a reduction of red wine vinegar.
There is no limit to Heston's excess!
When relatives pointed out that is really was rather nice of me to go to all that trouble for them, I had to explain that I did this recipe for myself, to see if I could do it.
If I had actually made this FOR someone, I would have exceedingly bitter and eternally hateful thoughts about that person for making me feel obliged to go through such extreme torture for a stupid meal.
Because I have made a few of Heston's recipes before I pretty much knew what I was in for.
- Heston Blumenthal: In Search of Perfection: Reinventing Kitchen Classics
- Further Adventures in Search of Perfection
- The Big Fat Duck Cookbook
I knew if I was going to that much trouble, I wanted more meat, so I grabbed 5lbs of 7 bone chuck steak on special for 99c lb, and 2 lbs of oxtail at $5 lb (no special there) for the oxtail's truly great flavor.
I bought some cheapo red plonk for $5 for 1.5L, so overall I was able to keep the cost down and the yield high.
I got these really great vegetables, leeks, tomatoes, mushrooms, and on and on. Chop em up, fry em, and add them all in.
And with a sinking feeling I realized that they were all going to be discarded. Sad.
The result? An absolutely insanely great stew. And that is what Heston is all about: insane, and great.
Another relative commented on the interesting and subtle sweet notes in the stew.
I tried to wave it off as being the sweetness of the cooked onions, but nooooo, that wasn't good enough!
So I was shamefacedly forced to reveal that yes, I had caramelized some turbinado sugar in a reduction of red wine vinegar.
There is no limit to Heston's excess!
When relatives pointed out that is really was rather nice of me to go to all that trouble for them, I had to explain that I did this recipe for myself, to see if I could do it.
If I had actually made this FOR someone, I would have exceedingly bitter and eternally hateful thoughts about that person for making me feel obliged to go through such extreme torture for a stupid meal.
Carbonated Chicken Consomme - Chicken-up.
Today I tried my carbonated chicken consomme.
It is really quite strange, it has the mouthfeel of coca-cola or seven-up, the saltiness of potato chips, and of course the chicken/vegetable flavor.
I guess I will call it chicken-up.
It is quite filling (from the carbonation I suppose, the fullness likely won't last long). It would make a good amuse bouche starter for a summer salad lunch on a hot day.
I made chicken broth in the usual way, then clarified this with egg-whites and shells, then chilled it, then carbonated it.
Here is my carbonating system.
It is really quite strange, it has the mouthfeel of coca-cola or seven-up, the saltiness of potato chips, and of course the chicken/vegetable flavor.
I guess I will call it chicken-up.
It is quite filling (from the carbonation I suppose, the fullness likely won't last long). It would make a good amuse bouche starter for a summer salad lunch on a hot day.
I made chicken broth in the usual way, then clarified this with egg-whites and shells, then chilled it, then carbonated it.
Here is my carbonating system.
GPSed Track "Track #4"
View my new track 
Powered by GPSed.com - Free Mobile GPS Tracking Service
GPSed Track "Track #2"
View my new track
Powered by GPSed.com - Free Mobile GPS Tracking Service
Subscribe to:
Posts (Atom)

